Azure Hybrid DNS Architecture
Azure private DNS is a great solution to simplify DNS resolution for cloud resources in Azure. However, chances are you have components in your infrastructure that do not natively integrate with Azure DNS zones. In this post, I will show you how you to enable your own DNS solution to resolve names from Azure private DNS zones with CoreDNS on Azure Kubernetes Service.
Table of Contents
This is a multi part article with the following parts:
Part 1 - Azure Hybrid DNS Architecture
Part 2 - Azure Hybrid DNS Part 2
Introduction
I will showcase how you can simplify the DNS resolution of Azure Private DNS zones from anywhere in your network using CoreDNS on a central, private AKS cluster.
Adoption of Azure Kubernetes Services (AKS) has increased over the last few month and since AKS private clusters are globally available, the demand has grown even more.
With new private clusters, new challenges are introduced as well - each private AKS cluster gets deployed with an private Azure DNS zone in which the Kubernetes Master API gets their DNS name in. This really opens the door to expand the capabilities of Azure Private DNS zones for other purposes as well.
DNS Resolution in Azure
In Azure, you can choose from three options for DNS resolution. Azure provided DNS, Azure Private DNS Zones and custom DNS.
Each of this options has its benefits depending on the goal you want to achieve.
Azure provided DNS
The default when you deploy a new VNET. Resolution is done in the Azure backend. This is mostly not sufficient because it is not possible to alter DNS zone names nor can the lifecycle be managed.
Azure Private DNS Zones
Azure Private DNS zones can be used to resolve names to a specific domain in your VNET. It supports features like auto registrations for VMs and is a great way to create split-horizon resolution. However, for your VMs to be able to resolve the names of these zones, the zone must be linked to each VNET. This can conflict with auto registration in certain scenarios.
Custom DNS
You can use your own DNS servers in Azure. This option offers more flexibility. For this, you need to configure the DNS server on each VNET.
Scenario
When companies start using cloud services, it has been common practice to migrate virtual machines to Azure first and shift workloads to cloud native services afterwards.
Therefore, some basic infrastructure gets set up in Azure as well - like domain controllers, DNS, VPN, networking and so forth.
I want to take a look at the Domain Controllers and DNS servers and how they are being integrated into Azure.
It is most likely, that a new AD site has been created and at least two domain controllers has been set up that also serve as DNS servers.
Those DNS servers are configured on all VNETs to resolve names in the entire network.
The following image shows this a little better:
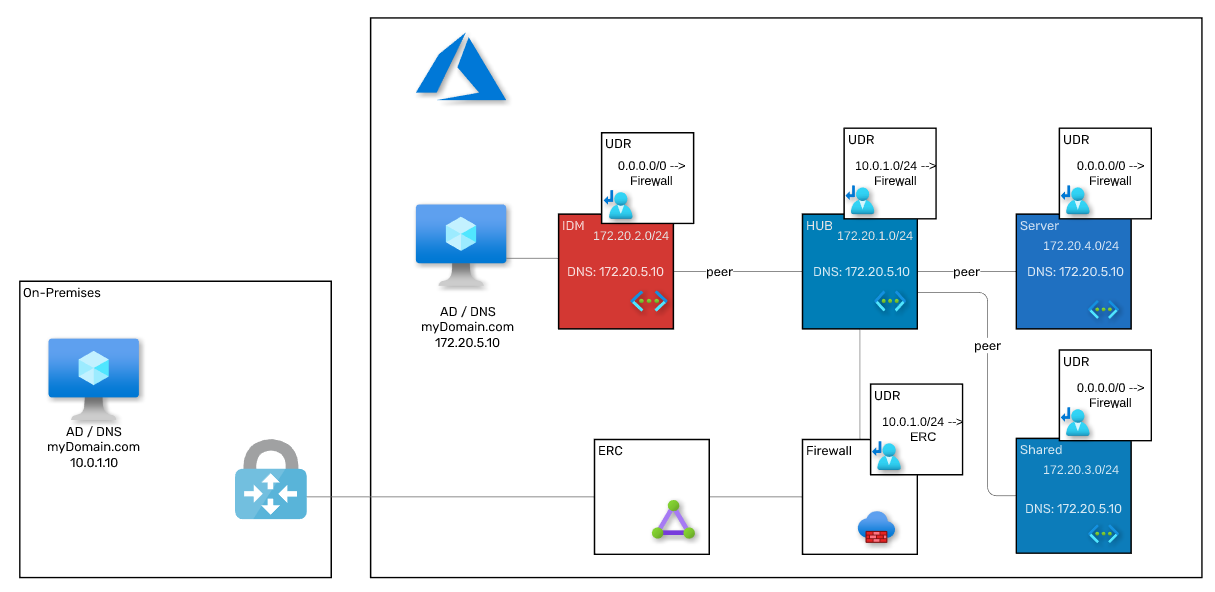 Architecture
This is a reference architecture with a simplified view that does not include all components involved nor is it accurate in terms of how the components are connected - it is supposed to give an overview of the data flow.
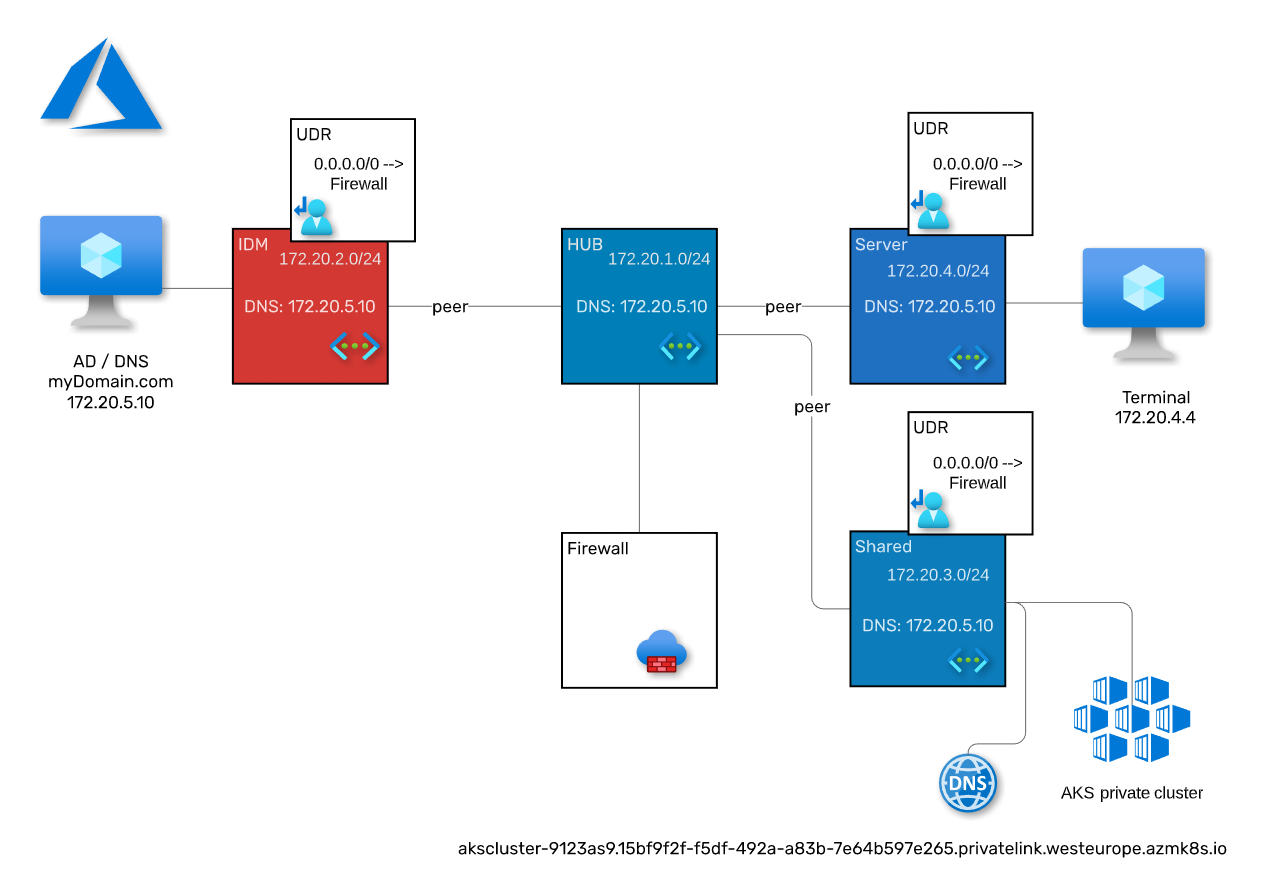
When you deploy a private AKS cluster into this, a private DNS zone gets created as well and linked to the VNET the cluster got created in.
 Architecture with AKS
At this point, the master API of the private AKS cluster akscluster-9123as9.15bf9f2f-f5df-492a-a83b-7e64b597e265.privatelink.westeurope.azmk8s.io can only be resolved (and therefore securely reached) from machines located in the VNET where the AKS got deployed in.
Further along, you might want to deploy several AKS clusters or just private DNS zones by themselves and all of them need to be resolved from anywhere in your network.
Solution / Architecture
In general, to resolve addresses from Azure with your own DNS Server, the DNS request for the particular zone must be forwarded to the virtual IP 168.63.129.16.
For private DNS zones, an additional zone link must be created:
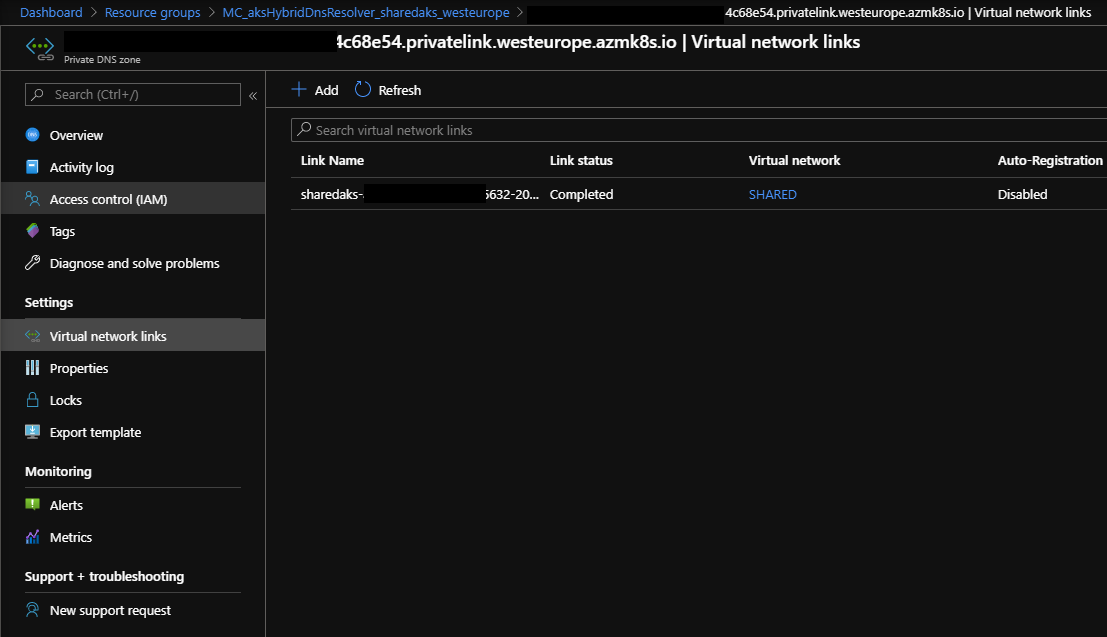 Azure Private DNS Zone Link
The approach I’m proposing uses the DNS server solution that is already in place - in my case a Microsoft DNS server that also acts as an Domain Controller.
This is very common but any regular DNS solution will work. The DNS server gets an conditional forwarder for the zone that points to CoreDNS running on AKS which will forward the requests to the virtual IP 168.63.129.16:
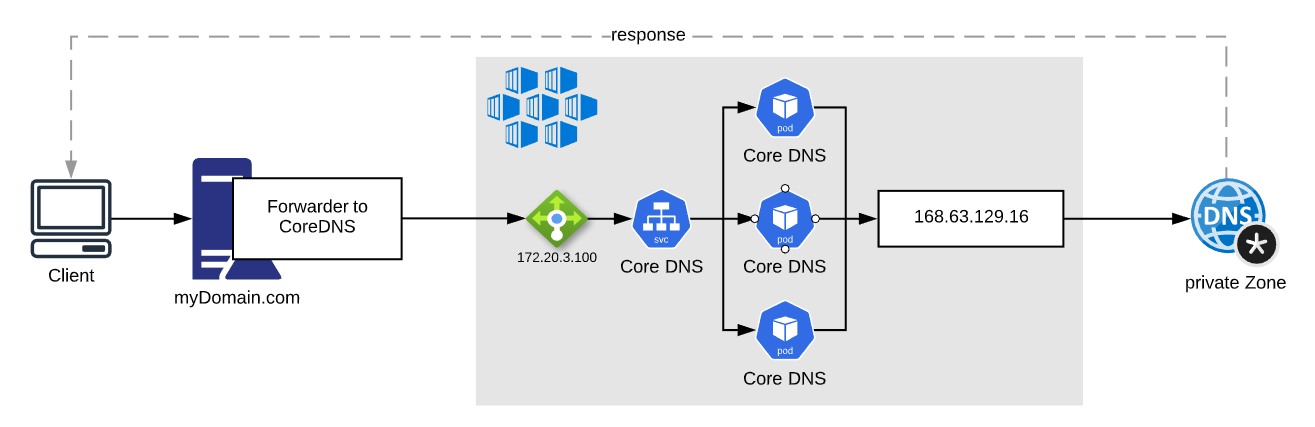 Custom DNS Forwarder Architecture
CoreDNS is a very lightweight, plugin based DNS solution that is perfect for this scenario.
The AKS cluster will be placed in the shared network and all private DNS zones will be linked to the shared VNET.
The Windows DNS server will be configured to forward the traffic based on requests of the zone privatelink.westeurope.azmk8s.io.
This architecture is based on the requirement to deploy several private AKS clusters. Each cluster comes with a private DNS zone in which the master API gets exposed in. In order to be more dynamic and to eliminate the task of creating or deleting a new conditional forwarder when a new cluster gets provisioned or decommissioned, one conditional forwarder gets created to a central AKS cluster that hosts CoreDNS. CoreDNS forwards all DNS requests to the virtual IP 168.63.129.16. When a new private AKS cluster is provisioned, the private DNS zone needs to be linked to the VNET of the shared AKS cluster and the resolution is established.
Setup
The following steps will describe the entire setup of a testing environment. However, in order to deploy this entirely on Azure, the on-premises part is excluded.
 Architecture
Resource Group / VNET
You might want to change some values so they fit into your environment.
The entire code is written to be executed consecutively.
This part creates the following resources:
- Resource Group
- UDRs
- VNETs
- VNET peerings
1 | $rg = 'aksHybridDnsResolver' |
Azure Firewall
This part creates the following resources:
- Azure Firewall
- Network Rule on Firewall
- Routes on UDR for Firewall, IDM- and Server VNET
For the sake of easy testing, I added only one rule to the firewall that allows absolutely everything - feel free to change it to the values you like 😉
1 | # create Firewall |
Virtual Machines / NAT
This part creates the following resources:
- Domain Controller
- additional Server
- NAT Rules on Firewall
Since no server is publicly accessible, two NAT rules are created on the Azure Firewall to access them using the public IP of the firewall.
1 | # create DC |
Configure Windows DNS Server
At this point, it is time to configure the Windows DNS Server.
- install DNS role
- install scoop
- install azure cli and kubectl (used later)
- setup DNS Zone
1 | # connect to the server |
I like to use scoop to install tools - you can also install the tools manually.
Start a PowerShell as an Administrator and run the following commands:
1 | Install-WindowsFeature DNS -IncludeManagementTools |
Setup the DNS Server:
1 | Add-DnsServerForwarder -IPAddress 1.1.1.1 -PassThru |
Create AKS Cluster
Sadly, there is no PowerShell cmdlet to setup a private AKS Clsuter into an existing VNET.
Therefore, install it using azure cli.
1 | create service principal |
Setup CoreDNS
To set up CoreDNS, we need to establish a connection from the DNS Server to the AKS cluster. Therefore, a temporary VNET link from the private DNS zone of the cluster to the IDM VNET needs to be created:
1 | Install-Module -Name Az.PrivateDns -Force |
Connect to the DNS server again:
1 | # connect to the server |
Open a PowerShell as an administrator and execute the following commands:
1 | # create conditional forwarder |
Copy the following content into notepad and save the file afterwards:
1 |
|
The .yaml file represents the configuration of CoreDNS - it consists of three Kubernetes objects:
- Service - used to expose the CoreDNS application with an Azure Load Balancer
- Config Map - the configuration of Core DNS
- Deployment - deployment of CoreDNS Pods
Now we need to login to azure using the azure cli and get the kubeconfig to connect to the AKS cluster:
1 | az login |
Afterwards, we can use kubectl to manage the cluster:
1 | kubectl create namespace dns |
You can check if the deployment was successful using the following commands:
1 | kubectl get pods -n dns |
The response should look like this:
 kubectl output
It can take a while until the external ip shows - a new Azure Load Balancer gets created in the background.
Final Steps
This part is for the following actions:
- remove temp VNET link
- set route to UDRs
- set DNS server to VNETs
- restarts all VMs
1 | # remove temp VNET link |
Conclusion
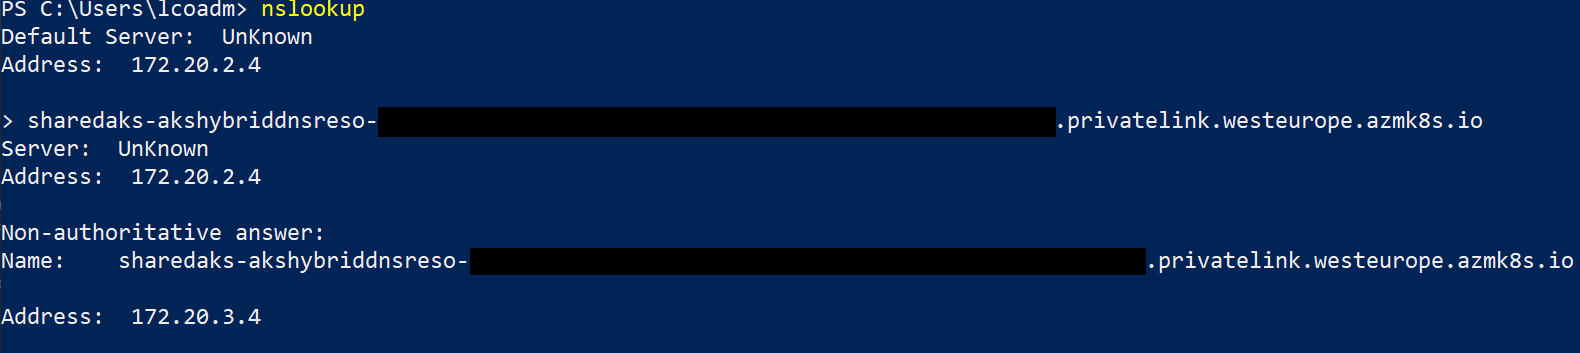
Now its possible to use any client in the network (that has the DNS server configured) to resolve the DNS name of the Azure Private Zone from the cluster.
 Custom DNS Forwarder Architecture
1 | # connect to the second server and test the DNS resolution there |
When a new private AKS cluster is provisioned, the private DNS zone just needs to be linked to the shared VNET and the DNS resolution is established.
If you want to use Azure Private DNS zones for other zones too, you need to create a new conditional forwarder on your DNS server for each zone that points to the CoreDNS load balancer.
When to use this?
Of course, just to forward some DNS requests, this is way too big in terms of administration, know-how and costs. However, if your organization uses container based applications, this solution is perfect for DevOps processes.
With a central AKS cluster, you are also be able to consolidate several applications running on VMs into container - for instance Elastic, Splunk, HashiCorp Vault and much more.
Make it production ready
To use this in a production environment, some steps should be taken care of.
Zone Requirements
Based on how your network is set up, you might want to change the conditional forwarder to something that matches the layout. You don’t want your clients in America to resolve names in Europe 😉
AKS / CoreDNS
For production workloads, Microsoft recommends at least three node AKS cluster.
The CoreDNS should get some affinity/antiaffinity rules to be distributed more evenly. If you use Helm and CI/CD, you might want to add the CoreDNS deployment into a Helm chart and deploy is with your pipeline of choice.