HashiCorp Vault - Authenticate and authorize AzureAD Users
The Secret Management Solution HashiCorp Vault allows the Integration of a variety of Identity Providers. Although currently no direct Implementation for Human Users of Azure AD exists, the JWT/OIDC Auth Method provides a way to enable authentication and authorization for Azure AD Users to HashiCorp Vault. This post shows how to configure HashiCorp Vault to enable User Login with Azure AD Credentials as well as assigning Permissions/Policies based on their Group Memberships.
Table of Contents
Introduction
Azure AD is Microsofts cloud-based identity and access management service. It provides an Implementation of OpenID Connect which is an authentication protocol that is build on OAuth 2.0 to enable Administators to use this Identity Platform for secure sign-in to external applications.
Scenario
The HashiCorp Vault JWT/OIDC Auth Method can be used for Authentication by either using OpenID Connect (OIDC) or by providing a JSON Web Token (JWT). This Blog Post is about the OIDC part of this Auth Method.
In this Scenario the following Environment is assumed:
- Running HashiCorp Vault Instance
- 2 Development Teams (Team Python-App and Team Go-App)
- Members of the two Teams need access to corresponding Paths in HashiCorp Vault (secret/python-app/* and secret/go-app/*)
- All Members of the two Teams are in corresponding Azure AD Groups
Overview
The following Graphic provides an Overview of the basic Login Flow that takes Place during OIDC Login. The Graphic is based on Azure AD but it also applies to most other OpenID Connect Identity Providers.
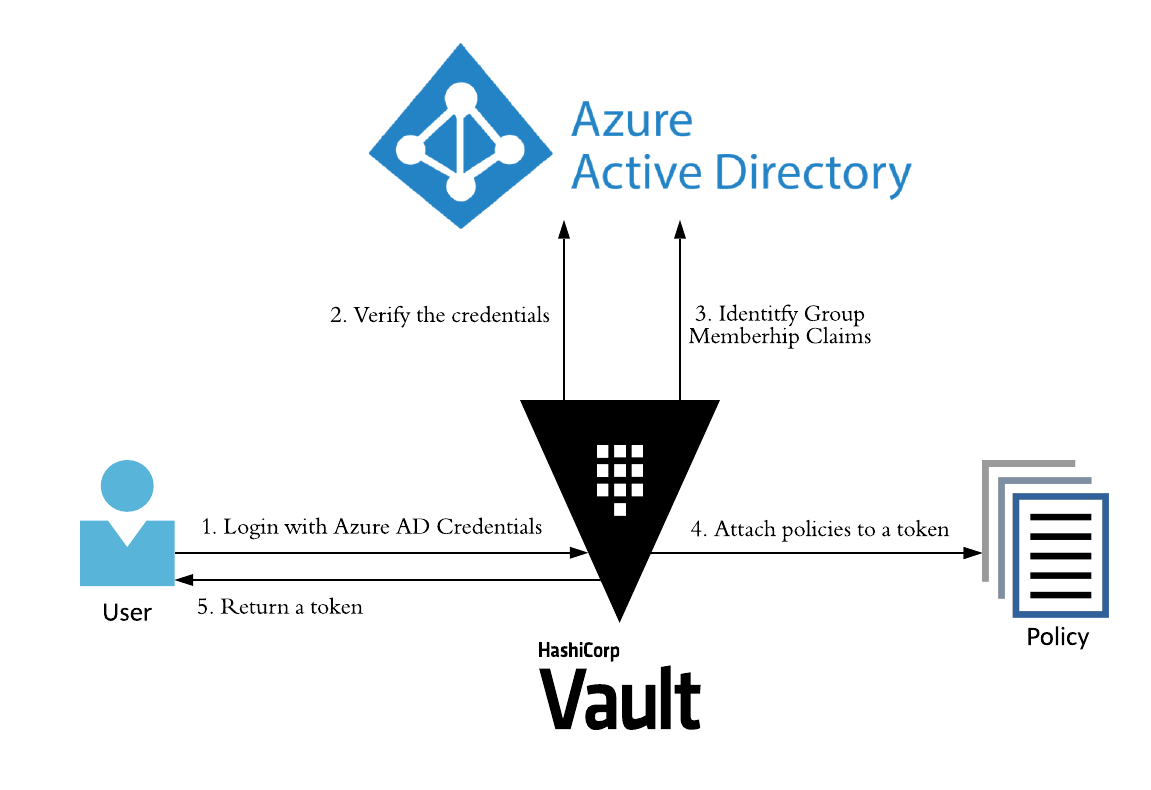 Azure AD Login Flow
Requirements
To configure an OIDC Application for Azure AD the following High-Level Steps have to be performed beforehand:
- Create or select an Azure AD Application
- Configure Redirect URIs (Type: web)
- Grant the AAD application the permission: Group.Read.All
- Create a secrets for the AAD application
- groupMembershipClaims should be set to “All” or “Security” in the App registration manifest
These steps usually need to be performed by an Azure Active Directory Administrator.
Configure Authentication
The following sections describe every step that setups the Azure AD Authentication with HashiCorp Vault.
Enable Auth Method
First enable the OIDC Auth Method (default path). This mounts the OIDC Auth Method at the path /auth/oidc and allows the Auth Method to be configured. Since this Auth method can be mounted multiple times it may be mounted at another Path in your Environment.
1 | vault auth enable oidc |
This Post assumes the standard Paths so adjust the Paths to the ones in your Environment if they should differ from the default Paths.
Determining OIDC Configuration Parameters
The OIDC Configuration expects the following parameters:
- oidc_discovery_url
- oidc_client_id
- oidc_client_secret
oidc_discovery_url:
This Parameter specifies the OIDC Discovery URL, without any .well-know components. For Azure AD this URL looks like this:
1 | https://login.microsoftonline.com/<tenant-id>/v2.0 |
Make sure to replace the tenant id with the ID of your tenant. There are multiple ways to find out the own tenant id. For example in the Azure Portal -> Azure Active Directory
oidc_client:
oidc_client_id and oidc_client_secret represent the Credentials for the Azure AD Application that was registered or selected for use with HashiCorp Vault.
| Parameter | Description |
|---|---|
| oidc_client_id | The Azure AD App registration Application (Client) ID |
| oidc_client_secret | The Azure AD App registration Application (Client) Secret |
These Values can be retrieved via the Azure Portal under Azure Active Directory-> App registrations. Select your App Registration to view the Details.
Writing OIDC Configuration
After retrieving all values for the basic OIDC Configuration it can be written to the Vault Instance. The Endpoint to write the config to is auth/oidc/config.
1 | vault write auth/oidc/config oidc_discovery_url="https://login.microsoftonline.com/<tenandid>/v2.0" oidc_client_id="<secret>" oidc_client_secret="<secretid>" |
Make sure to replace your tenant specific values!
Write OIDC Role to use for Authentication
The Role configuration specifies User Claims, Group Claims, OIDC Scope, Default Access Policy, Token TTL and allowed Redirect URIs:
| Parameter | Description |
|---|---|
| user-claim | The claim to use to uniquely identify the user; this will be used as the name for the Identity entity alias created due to a successful login |
| oidc_scope | A list of OIDC scopes to be used with an OIDC role |
| groups_claim | The claim to use to uniquely identify the set of groups to which the user belongs |
| policies | List of default policies to encode onto generated tokens. |
| ttl | The incremental lifetime for generated tokens |
| allowed_redirect_uris | The list of allowed values for redirect_uri during OIDC logins |
Write the Role configuration with the following command:
1 | vault write auth/oidc/role/aad user_claim="sub" oidc_scopes="https://graph.microsoft.com/.default" groups_claim="groups" policies=default ttl=1h allowed_redirect_uris="http://localhost:8250/oidc/callback" allowed_redirect_uris="https://localhost:8250/oidc/callback" allowed_redirect_uris="https://hostname.domain:8200/ui/vault/auth/oidc/oidc/callback" |
Verify OIDC Authentication Configuration
To verify the authentication configuration, login with the following command and follow the Interactive OIDC Login Flow by providing Credentials from your Azure Active Directory:
1 | vault login -method=oidc role=aad |
 OIDC Login Flow
The User is successfully authenticated. As currently no further Authorization is configured only the default Policy is assigned to the User.
Configure Authorization
Authorization determines which Paths in HashiCorp Vault the User is able to access. These Permissions are defined by HashiCorp Configuarion Language (HCL) policy files. In this Post we create two Policies for each of the Teams that shall receive specific Path permissions. These Policies will be attached to Groups.
Create HashiCorp Vault Access Policies
In this Post two Policies are uploaded for the two Teams.
HashiCorp Vault Policy for the Python-App Team:
1 | # Vault policy for the python-app Team |
Save this to a file called team-python-app-policy.hcl and upload with:
1 | vault policy write team-python-app-policy "team-python-app-policy.hcl" |
HashiCorp Vault Policy for the Go-App Team:
1 | # Vault policy for the go-app Team |
Save this to a file called team-go-app-policy.hcl and upload with:
1 | vault policy write team-go-app-policy "team-python-go-policy.hcl" |
Create or select Azure AD Groups
To assign HashiCorp Vault Policies to Members of certain Azure Groups we need to map internal HashiCorp Vault Groups to external Azure AD Groups. In this Post the following Azure AD Groups have been selected:
 Azure AD Development Groups
Group Members of these two Groups consist of Team Members of the respective Development Teams. If new Azure AD Groups are created, the Object ID needs to be known as the Mapping depends on this unique GUID.
Create Group Mapping
The following Steps need to be repeated for every Azure AD Group. In this Post for both Development Groups.
First create the internal HashiCorp Vault Group:
1 | vault write identity/group name="python-app" type="external" policies="team-python-app-policy" |
Creating the internal Group returns a canonical_id which is GUID-formatted. This canonical_id is required for the Mapping of the Azure AD Group and needs to be pasted into the next command.
Second, map the Internal Group to the external Azure AD Group using the Azure AD Group Object ID and the internal HashiCorp Vault canonical_id:
1 | vault write identity/group-alias name="<azuread-group-object-id>" mount_accessor="oidc_mount_accessor" canonical_id="<canonical-id>" |
Verify Authorization Configuration
To verify the Authorization Configuration login to Vault using Azure Credentials of one the Team Members.
1 | vault login -method=oidc role=aad |
The Policies that are attached to the Groups will be added to the Token if the Group Claims match. Following the OIDC Login Flow as one of the Members of the Go-App Team once more, shows the following Output:
1 | Success! You are now authenticated. The token information displayed below |
The team-go-app-policy has been added to the policies of the User and he is now ready to access the Paths that have been specified for his team.
Summary
To configure Azure AD Authentication for Users in HashiCorp Vault is pretty straight forward once all required parameters are known. The Authorization configuration performed in this blog is just the tip of the Iceberg. Many more custom claims can be configured to apply Vault Policies to a certain set of Users besides their Group Memberships, like Divisions or Departments. Visit the Vault Docs for more Information about the JWT/OIDC Auth Method.