Office 365 low hanging security fruits - MFA
In this part of the series I want to talk about the most obvious and meaningful security measure for O365 – Multifactor authentication (MFA). The well-established technology can significantly reduce the attack surface of your organization and is easy to implement for O365 administrators. It should be your first line of defense against phishing and replay attacks in your security environment. In this article I want to talk about the technical/mathematical concept of the standard and show you how to activate the tool and its features in your tenant.
This is a multi part security series for O365 with the following articles:
Table of Contents
Introduction
I believe by now everyone in the IT environment, who didn’t live under rock in the last decade, has heard of MFA. However, I thought it might be helpful to explain the fundamentals behind it in order to lift the mystifying curtain of the technology. MFA uses, as the name already tells, several factors to authenticate the user against the system. Usually something you know (a password) and something you have (a hardware or software token) is used, but it’s entirely possible to take something you are (biometrics such as fingerprints or face scanner). Any combination of the three is considered MFA, but usually a password plus a token is used, as this method is the cheapest and easier to implement for companies than biometric scanner – even if they are much cooler 😉
Technical basics
I don’t want to go into detail regarding the user password part of the process. The aspects of this such as password policy, hashed password databases etc. are far too comprehensive to discuss here and are out of the scope of this article. Instead the focus is on One-Time Passwords (OTP), which run on a second device for the user, usually a smartphone with an authentication app or a usb-sized hardware, but technically the paper-based token list of your old school bank counts as well 😉.
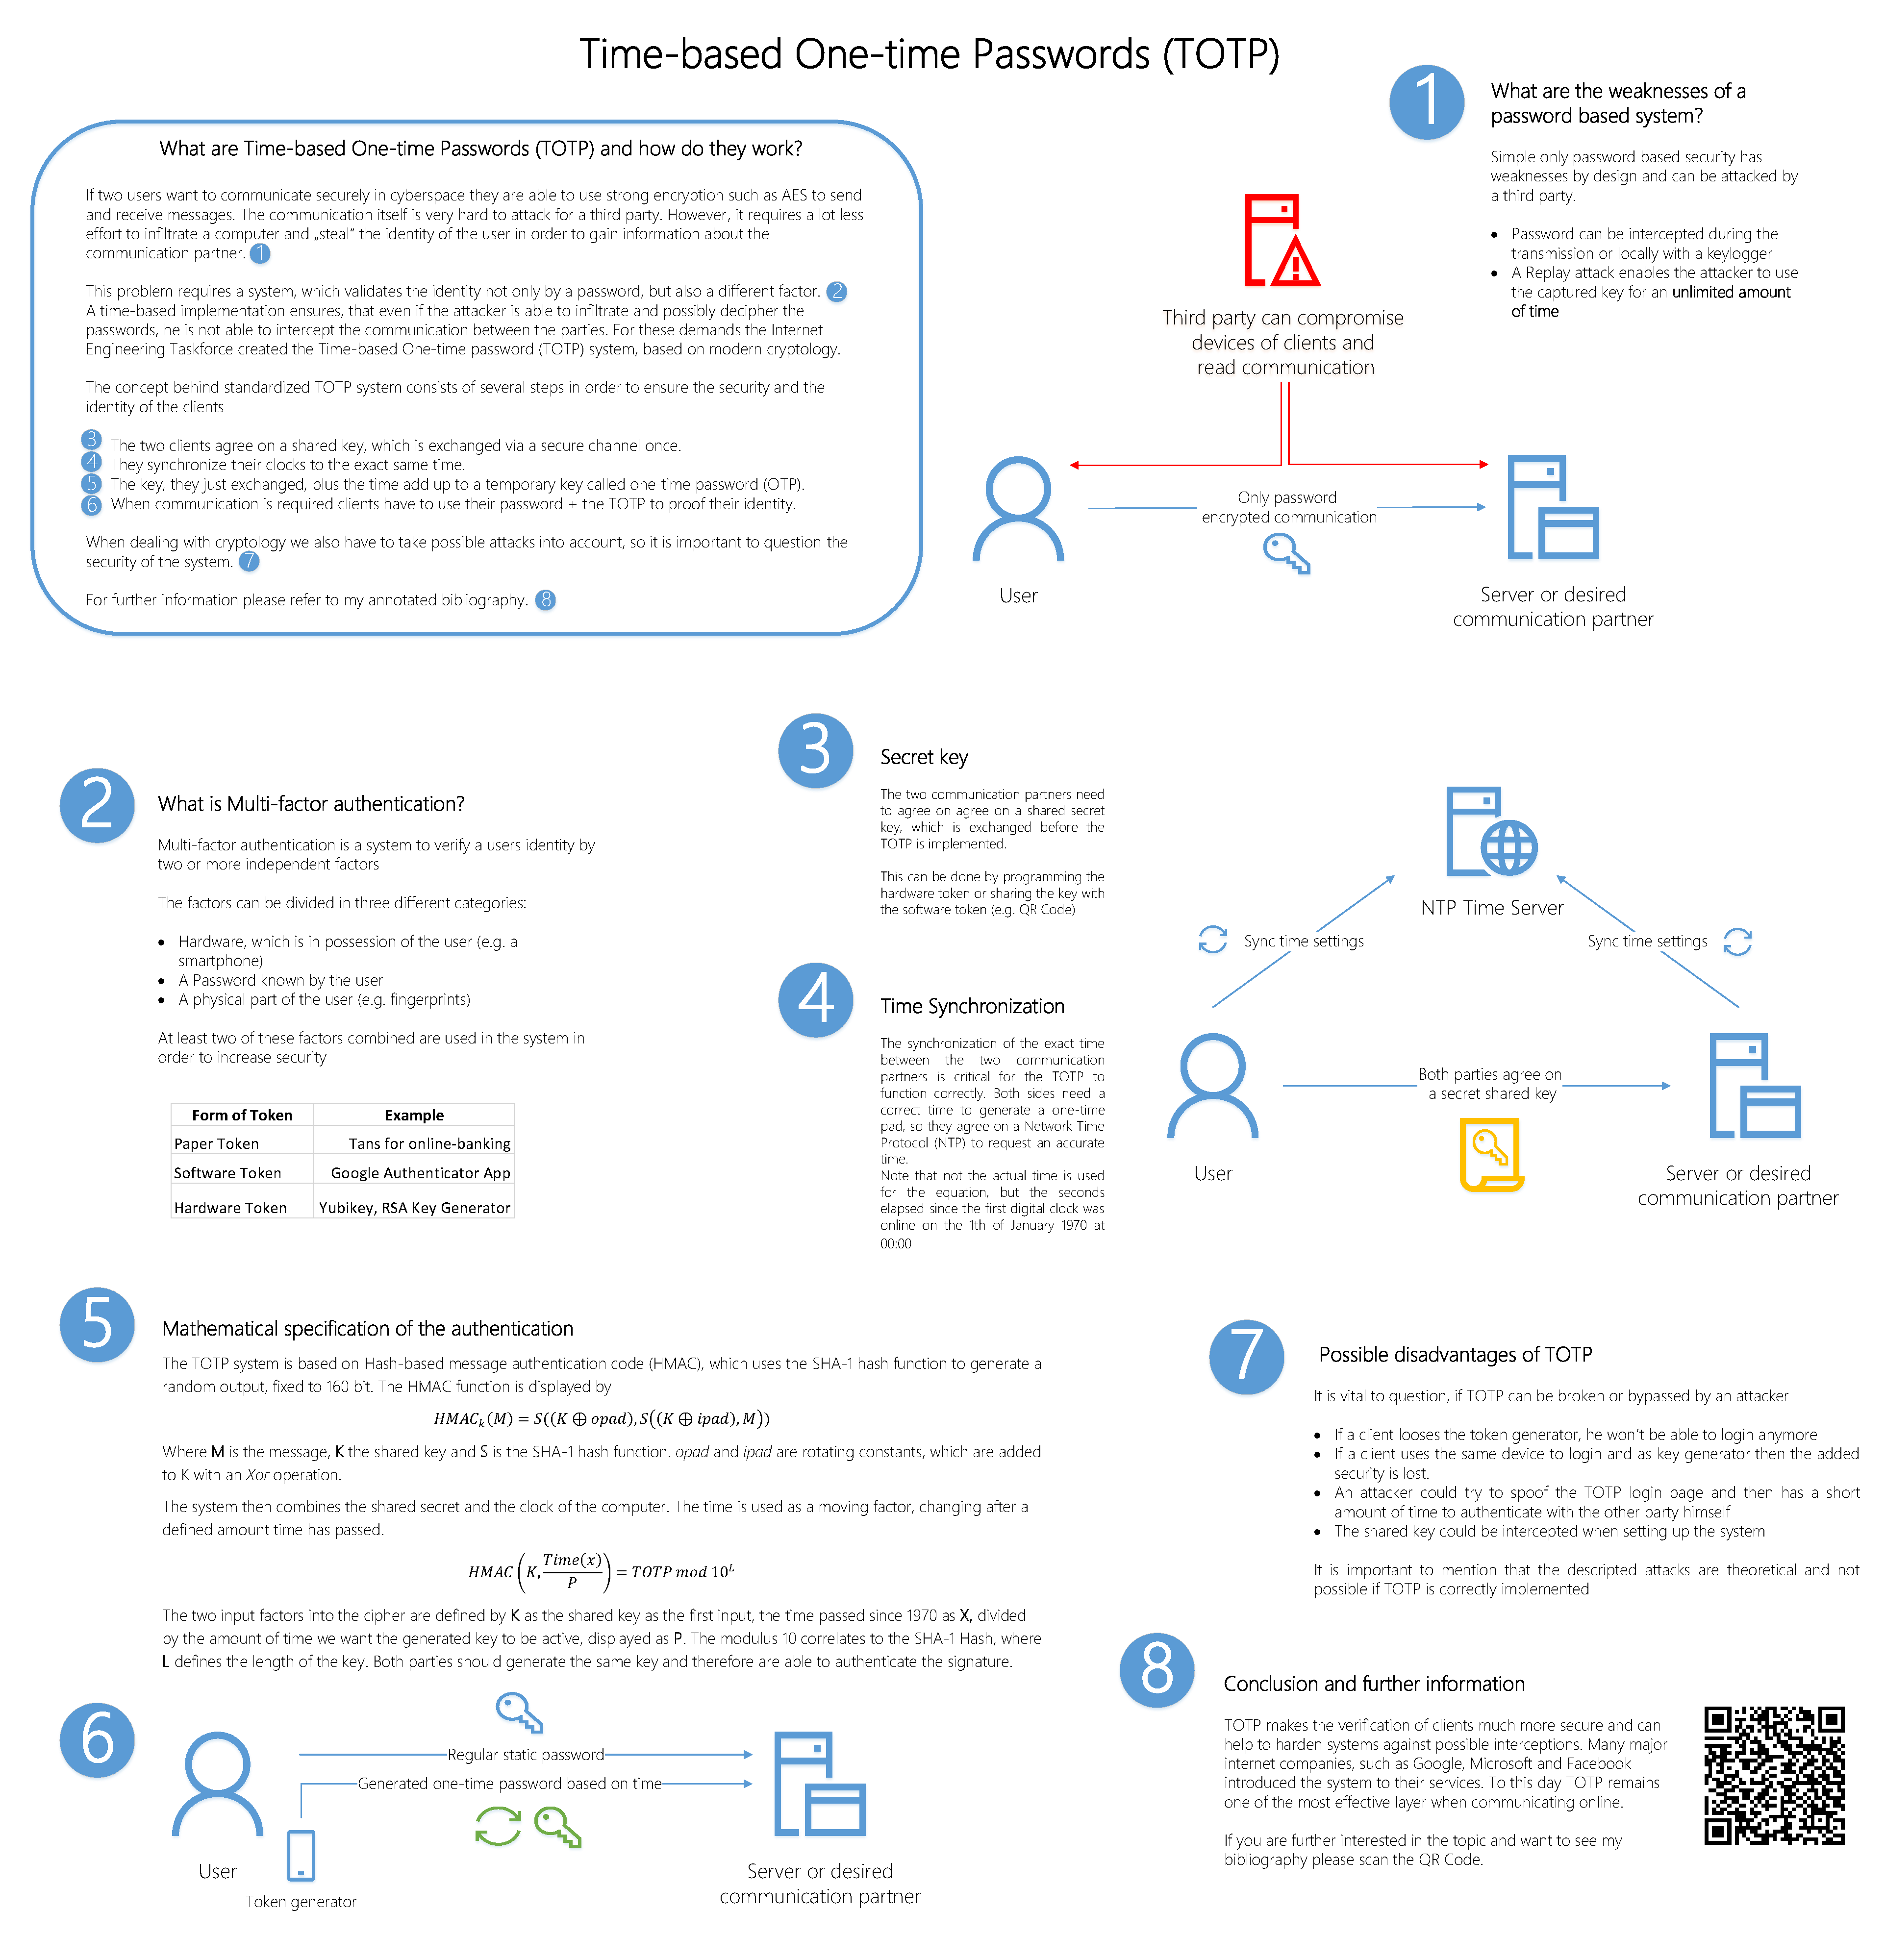
The two standard procedures for OTP are HMAC-based One-Time Password (HOTP) and Time-based One-Time Password (TOTP). Both procedures create a passcode that is only valid once for a transaction or login. The difference between TOTP and HOTP are actually minor, HOTP uses increments based on the HMAC hashing algorithm, counting up after each authentication. However, with HOTP the token is valid until it is used or a new one is generated TOTP has constant incrementation with time as the moving factor on both sides.
Advice: Keep in mind that TOTP systems rely on the fact all devices run the correct time. If the authentication fails, make sure to check the connection to the NTP server and your time settings first. Below I have created a poster to show all the features of TOTP, the full PDF is available to download here
 MFA behind the scences look
Implementation
Let’s get to the practical side of MFA in O365, which is actually pretty simple. The tool is based on the Azure Multi-Factor Authentication, but it’s available for all versions of O365, so there are no excuses on that side. The number of features you can use might vary, based on what kind of AAD or O365 you are using. But keep in mind that different setups of your environment might require some preparation before you can activate the feature, especially if you have some legacy application om premise. A good checklist for this can be found here. When you enable the tool, your users have several methods to use as a second factor for their authentication:
- Notification through mobile app
- Verification code from mobile app or hardware token
- Text message to phone
- Call to phone
- App passwords (for legacy apps)
I personally would recommend No. 1 with the Microsoft Authenticator App, which is based on HOTP, for several reasons. First, because the user can use their smartphone to authenticate and doesn’t require an extra hardware token, which are expensive and a pain to handle for your team. Second, because you can use the app for other logins, and it will be restorable in case you lose your phone. And finally, because it is a lot easier to just confirm the login than typing in the random numbers in time. This will raise acceptance in your organization significantly. The only disadvantage of the system is that it requires an internet connection to function, so if you have areas with no Cell or Wi-Fi coverage it might not be suitable for you. The next better option is No. 2, preferable software-based, as hardware-based is a lot harder to setup. Text Message authentication has been broken or successfully attacked in the past, so you might want to stay away from it.
Rollout
When it comes to the rollout of the tool an advice from my side: Start small! Identify user groups such as executives and people with access to the company bank accounts and enable MFA for these groups first. You can mitigate the worst risks this way and these users can help others to do the setup process later. Some administrator roles in the tenant will be forced to setup MFA automatically to protect their account privileges anyway and for the rest you should manually enable it. But if you want to setup MFA for your normal users, simply follow these steps:
- Select active users under users in the O365 Admin Interface
- Click on Multi-factor authentication, which will take you to a new window
- Mark the users you want for MFA or use the “update in bulk” button
- Click on enable and then confirm the action, here you can also get instruction material for the user (OSI layer 8 problems)
- The user will see the request to setup MFA on the next login and can choose what method to use.
Inform your users about MFA and tell them about the advantages of the system. The more guidance you prepare beforehand the less hassle you or your service team will have helping the users during the setup.
Now you have significantly increased the security of your first line of defense, however there are still quite a few things you can do to improve MFA. If you use AAD and Azure MFA you can disable MFA for the internal IP ranges to save time for your users if they are on premise or for federated users with conditional access. A guide for this can be found here and here. If you use Azure MFA you should also enable logging for MFA denials and tunnel them to your SOC in order to spot potential attacks quickly.