Migrate Azure Pipelines to GitHub Actions - Part One
Lately, I have been working on a lot of migrations from CI/CD environments of Azure Pipelines to GitHub Actions. I have been working with both tools for quiet some time now and I would like to share what I learned along the way.
This is a multi part article - find the other parts at the links below:
- Part 1 - Intro/Source Code Migration/Scopes/…
- Part 2 - Trigger/Concurrency/Agents-Runner/…
- Part 3 - Variables/Secrets/Artifacts/…
- Part 4 - Templates/Conclusion/Examples/…
Table of Contents
Introduction
Moving CI/CD environments from one provider to another comes with its challenges - handling of credentials, dependencies among jobs, accessing resources and so on. Moving from/on Azure DevOps to GitHub is not as straight forward, but I will go over the differences so you can get started.
I will only cover yaml-based Azure Pipelines. Also, I will primarily focus on builds/deployments on Microsoft Azure. However, most of the steps applicable for any public or private cloud provider.
General Considerations
When you move your source code control and CI/CD environment to GitHub, there are some general considerations:
License
GitHub has several licenses to apply and depending on your needs, you can check them out here.
Identity and Access Management
Depending on the license you use for your organization, you can either provision user accounts with SCIM (Enterprise license) and use SAML for authentication or your users can bring their own account and you can invite them to access your organization. Either way, you can enforce policies for all users, that e.g. MFA setup is required or only certain public IP ranges can access the source code.
Yopu can create Teams (a group like construct) to grant access to repositories within your organization.
This is by far not everything in regard to this topic and you can learn more about it here.
Repository Structure
When it comes to how you structure your repositories, there a some key differences between Azure Repos and GitHub. In Azure DevOps, there a projects that can house several repositories and manage the access to said repositories. In GitHub, there is no such thing, each repository is directly part of the organization and permissions need to be managed on a repository basis.
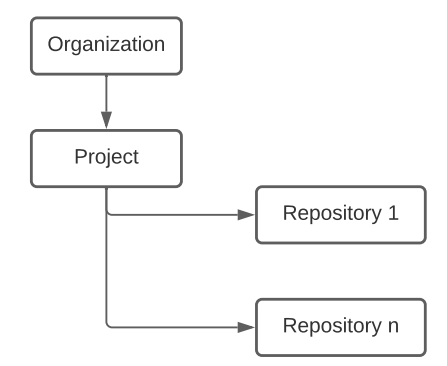 Azure DevOps Structure
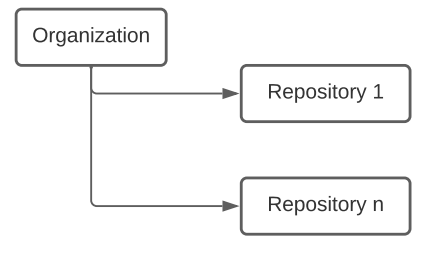 GitHub Structure
Source Code Migration
The very first step is to migrate your source code to a GitHub repository.
1 | git clone --mirror https://url-of-the-source-git-repo.git |
This will clone the entire repository including existing commits and branches.
Stages/Jobs/Steps vs. Jobs/Steps
An Azure Pipelines pipeline has three different scopes:
- Stages
- Jobs
- Steps
An GitHub Actions pipeline has two scopes:
- Jobs
- Steps
GitHub has one scope less, there are not stages. If you use stages in Azure Pipelines, you need to convert them into GitHub Actions jobs and create dependencies that way.
Azure Pipeline - Stages
A pipeline can have several stages, which can have several jobs, and a job can have several steps.
Stages can only be used in yaml-based pipelines and also not in release-pipelines.
You can organize pipeline jobs into stages. Stages are the major divisions in a pipeline: “build this app”, “run these tests”, and “deploy to pre-production” are good examples of stages. They are logical boundaries in your pipeline where you can pause the pipeline and perform various checks.Every pipeline has at least one stage even if you do not explicitly define it. You can also arrange stages into a dependency graph so that one stage runs before another one. There is a limit of 256 jobs for a stage. >source
Stages are required if you want to use approval steps (usiung Azure DevOps environments) in your pipeline.
Scopes can inherit information from the parent object - a job can inherit information from the stage - for instance about the VM the job is supposed to run on - however, the job can also overwrite these information if its necessary.
Azure Pipeline - Jobs
Each pipeline has at least one job, even if you only add steps to it. You can find the schema definition here.
Azure Pipeline - Steps
Steps in Azure Pipelines is the entity that actually execute the required tasks. Like the git checkout, tasks to build your software, running scripts, and the deployment steps.
1 | - stage: Build |
GitHub Actions - Jobs
GitHub Actions are allow the creation of workflows, which are the actual CI pipelines.
A workflow is a configurable automated process made up of one or more jobs. >source
GitHub Actions - Steps
Like in Azure Pipelines, steps in GitHub Actions is the entity that actually execute the required tasks. Like the git checkout, tasks to build your software, running scripts, and the deployment steps.
1 | jobs: |
Checkout
The checkout step is important for either tool because you (probably) need to access your source code to build the application. The checkout step clones the current repository to the worker agent.
Azure Pipelines
By default, each job checks out the repo the pipeline is triggered from, even if no checkout step is defined.
You can define the several checkout action explicitly (described in the comments in the example below):
1 | ... |
You can read more about the checkout task of Azure Pipelines here.
GitHub Actions
When you create a new workflow from scratch, the checkout step is included in the pipeline:
1 | ... |
This will checkout the current repo and branch.
In case you do not need to checkout any repo, just delete the action and no checkout will take place. I find this more intuitive than the default action of Azure Pipelines, because whats not there, will not be done.
To checkout multiple- or other repos, you can define the checkout like this:
1 | ... |
The checkout step offers several options that suits all scenarios, you can find more in the official docs here.
Next
In part 2 we will check out triggers, concurrency, dependencies, conditions, and more!